Showing posts with label Up-Cycle. Show all posts

Tuesday, October 29, 2013

Halloween treat holders made from recycled toilet paper rolls.

My first ever YouTube tutorial

 Halloween treat holders made from recycled toilet paper rolls. 


Get Your DIY on

I thought I would make some treats for my son to take to his school tomorrow for Halloween, so thought I would burst the YouTube bubble and try to do a tutorial on how I made them.
I was a little nervous doing this, but I am sure as I do more I will get better with each one I do.. ☺
A big thanks to my husband for helping with the editing. (I will promise to get it in one take next time heheh)

I hope you like my tutorial.. ☺
http://youtu.be/BAAb0ZErXyw

My Links:
STAMPIN UP STORE: http://daneve_ah-tissue.stampinup.net
FACEBOOK: https://www.facebook.com/AhTissue
FACEBOOK: https://www.facebook.com/GetYourDiyOn
INSTAGRAM: http://instagram.com/daneve_ahtissue#
PINTEREST: http://www.pinterest.com/daneve
BLOG: http://getyourdiyon.blogspot.com.au/

Supplies used from my Stampin Up store :

. Tombow Multi-Purpose Adhesive - http://daneve_ah-tissue.stampinup.net

. Uni-Ball Signo Gel Penhttp://daneve_ah-tissue.stampinup.net


Get Your DIY on

Monday, July 15, 2013

Ah-Tissue at the Confetti Fair Brisbane

On Sunday I had a stall at the very first Brisbane Confetti Fair which was held in the beautiful Old Museum. The Confetti Fair is new to Australia and is where great party ideas come together. Australia's only boutique party fair ~ www.confettifair.com.au
What you see there is exhibitors showcasing the best in party ideas; decor, cake, sweets, flowers, planning, stationery, dessert tables, styling, & products. 
 
Here are a few photo's of my stall..
 
Flower Backdrop by Daneve @ Ah-Tissue


 I was a fantastic day!!

Thursday, May 30, 2013

Craft Room Make Over!!

Update..


So many things have been keeping me busy of late and I have been so slack with blog posts.  I thought I would share one of the things that have been keeping me busy of late.. We decided to make an official Craft Room/ Project Studio at our place, which has been a long process but it is nearly there..

I am at the decoration stage of the room and wanted to share a few things that I have been able to do this week..

I have been recycling pasta sauce jars into craft storage jars. I will be doing a fair few of these for my wall unit which I will share once I have finished.. 


Yesterday I also made a start on making some storage for my twine stash. Using the same design as the button ones, as it will be going on the same wall unit. With these jars I hammered a hole into the lid for easy access to the twine. Really wanting everything to match in the new craft room as I am hoping it will help me keep organised heheh If you are on Instagram make sure you come follow me as I will be sharing a lot more photos of my handmade craft love. User name is @daneve_ahtissue


Today I was able to put this up in my craft room/studio not sure if I am finished but think it looks great.. :) this photo doesn't really capture the true colours but think you can see what colour theme I have gone with in the room.


I will be sharing how I did this in another post.. What do you think?

Kind Regards
Daneve
Owner, Mum & Creator
Ah-Tissue

Monday, July 16, 2012

DIY - Shopping List Frame


 Following on from the post I did here..

 This one is for your kitchen, it is perfect to write down once you run out of something before you need to do your shopping..

http://getyourdiyon.blogspot.com.au/2012/07/diy-shopping-list-frame.html


  • To make this I found a spare frame and printed out one of the below printable that my lovely husband has done for me.
  •  If you have an old frame that doesn't have the glass anymore all you need to do is laminate the image and pop it in the frame as it will work the same way..
  • The only other items you will need is a whiteboard pen and a cloth to wipe off old thoughts.

Free Printables
http://getyourdiyon.blogspot.com.au/2012/07/diy-shopping-list-frame.html

Download A4 size HERE
Download 8x10 HERE 

http://getyourdiyon.blogspot.com.au/2012/07/diy-shopping-list-frame.html

This is now in our kitchen getting used already..

Enjoy

xo
Daneve

Saturday, July 14, 2012

DIY - Can't Sleep Thoughts Frame

http://getyourdiyon.blogspot.com.au/2012/07/diy-cant-sleep-thoughts-frame.html

Does anyone have trouble falling asleep because you have too many thoughts going around in your head?

 Well I do, and also have wake ups in the middle of the night. Then can't get back to sleep because I am thinking about things that need to be done the next day.

I wanted to make myself one of these frames so I can right them down and be able to remember them in the morning..
  • To make this I found a spare frame and printed out one of the below printables that my lovely husband has done for me.
  •  If you have an old frame that doesn't have the glass anymore all you need to do is laminate the image and pop it in the frame as it will work the same way..
  • The only other items you will need is a whiteboard pen and a cloth to wipe off old thoughts.

Free Printables to choose from:

http://getyourdiyon.blogspot.com.au/2012/07/diy-cant-sleep-thoughts-frame.html

http://getyourdiyon.blogspot.com.au/2012/07/diy-cant-sleep-thoughts-frame.html

http://getyourdiyon.blogspot.com.au/2012/07/diy-cant-sleep-thoughts-frame.html

Please let me know if you would like any in a different colour.

I am loving my new addition to my bedroom.

http://getyourdiyon.blogspot.com.au/2012/07/diy-cant-sleep-thoughts-frame.html

I would love to see any photos if you ever make one of my DIY projects feel free to email me at ah-tissue@hotmail.com

Enjoy!!
Daneve
xox

Friday, June 29, 2012

DIY Washi Tape Dispenser made from a Cling Wrap box.

DIY Washi Tape Dispenser made from a Cling Wrap box. http://getyourdiyon.blogspot.com.au/2012/06/diy-washi-tape-dispenser-made-form.html

I am starting to build up my Washi Tape collection and really needed a dispenser for them but didn't want to spend money on one. So I had a look around the house to see if I could make one, well funny enough I had just finished a roll of cling wrap and thought this is perfect.

DIY Washi Tape Dispenser made from a Cling Wrap box. http://getyourdiyon.blogspot.com.au/2012/06/diy-washi-tape-dispenser-made-form.html

In our house hold we are big on recycling so I think I will make a few more once my collection grows.

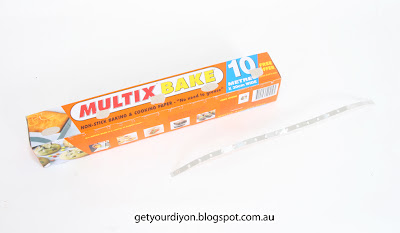
Step 1. Don't throw out your kitchen paper dispenser boxes next time you finish a roll. The ones that have the serrated metal strip on them.

DIY Washi Tape Dispenser made from a Cling Wrap box. http://getyourdiyon.blogspot.com.au/2012/06/diy-washi-tape-dispenser-made-form.html

Step 2. Carefully take of the serrated metal strip, it should just peel off starting from one end first.
(Be very careful as it is sharp)

DIY Washi Tape Dispenser made from a Cling Wrap box. http://getyourdiyon.blogspot.com.au/2012/06/diy-washi-tape-dispenser-made-form.html


Step 3. Cut off the top lid flap.

DIY Washi Tape Dispenser made from a Cling Wrap box. http://getyourdiyon.blogspot.com.au/2012/06/diy-washi-tape-dispenser-made-form.html
Step 4. Glue on your desired paper or some contact paper. ( I used Kraft paper and covered it in clear contact)

DIY Washi Tape Dispenser made from a Cling Wrap box. http://getyourdiyon.blogspot.com.au/2012/06/diy-washi-tape-dispenser-made-form.html


Step 5. Hole punch each ends then you can add a piece of dowel. 


Step 6. Hot glue the sarrated strip back on one side of the box, make sure you glue the serrated bit of the strip slightly higher than the edge of the box as this will make is easier the cut of the tape.

Once step 6 is done you can add your tapes to your new dispenser.

Hope you enjoy it as much as I am enjoying mine..

xo
Daneve

DIY Recycled Activity Box

DIY Recycled Activity Box http://getyourdiyon.blogspot.com.au/2012/06/diy-recycled-activity-box.html

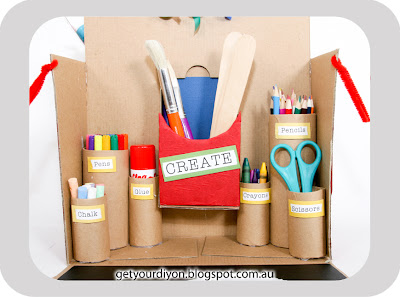
As I mentioned we have a Birthday Party on the weekend for our friends little boys 3rd Birthday.  I really wanted to make use of 1 of the left over Picnic Baskets which is in the below post. So when I was looking at them, I thought about this idea of up-cycling them into a "Kids Activity Box", I am really happy how it turned out.

Step 1. First I peeled off the picnic blanket that was on the inside flap then I replaced it with a piece of chalkboard adhesive.


DIY Recycled Activity Box http://getyourdiyon.blogspot.com.au/2012/06/diy-recycled-activity-box.html


Step 2. Cut up toilet rolls and a postage tube then glue on some Kraft Paper (color & print is up to you) 
To make the main center holder, I just cut up some cardboard and hot glued them to form the holder. You will see the box already has the two bits of cardboard which you can create the side flaps of the holder.


Step 3. Work out your positions of your tube holders then hot glue them into place. You can also glue on little labels to them like I have.


DIY Recycled Activity Box http://getyourdiyon.blogspot.com.au/2012/06/diy-recycled-activity-box.html


Step 4. Paint the sides of the box in your desired colour, then you can add either paper or adhesive (contact paper) to the front and back of the box.

DIY Recycled Activity Box http://getyourdiyon.blogspot.com.au/2012/06/diy-recycled-activity-box.html


Step 5. Print out the free label to stick on the front and back of the box.


With the other side of the box i have added a few extra items for him to use.

DIY Recycled Activity Box http://getyourdiyon.blogspot.com.au/2012/06/diy-recycled-activity-box.html


I am sure the kids will get alot of use out of it.

Let the Creating begin I say!!!

xo
Daneve

Wednesday, June 27, 2012

DIY Picnic basket out of an IKEA carry box.

DIY Picnic basket out of an IKEA carry box http://getyourdiyon.blogspot.com.au/

When planing any of my parties am a big beliver in recycling things before spending a lot of money at party stores. You can be amazed at what you can find and re-use over and over again. 

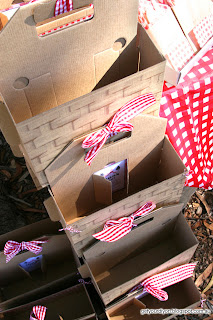
When I started to plan my son's Birthday picnic in the park party, I really thought it would be nice for every family to fill up a basket with their lunch, then to sit on the ground and have their own little picnic lunch.
As I was on a tight budget, I really didn't have the money to buy 20 real baskets. I noticed a friend carrying a free cardboard carry holder that she had just picked up at IKEA. The idea came into my head on how I could make use of the baskets and knew they could be used again after his party.
 As I needed 20 holders, I didn’t just want to walk out with them, so I asked the staff if I could purchase them. I was lucky to find out that I only needed to pay 20 cent for the whole lot! Bargain!!

DIY Picnic basket out of an IKEA carry box http://getyourdiyon.blogspot.com.au/
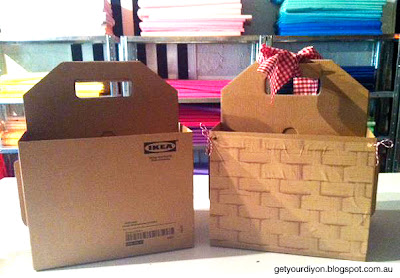
So this is a before and after shot.
(please excuse the iPhone photo)


DIY Picnic basket out of an IKEA carry box http://getyourdiyon.blogspot.com.au/

Step 1. Choose the side you want to make the drop down picnic blanket side. I chose the side that had the little middle window looking side. Once you have chosen the side, you can cut both corners of that side to open it up. (Use scissors or a Stanley knife to do this)


DIY Picnic basket out of an IKEA carry box http://getyourdiyon.blogspot.com.au/

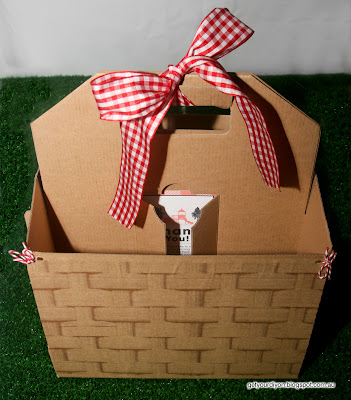
Step 2. Glue down the Basket weave print onto the front and back of the basket. I have included the free printable here of the weave. Cut up brown craft paper in A4 size and place them though the printer and trim them up a little before gluing them on.
  • Hole punch the two top corners of the flap and both sides of the front of the box. This will be where you can tie some string to hold it closed.

DIY Picnic basket out of an IKEA carry box http://getyourdiyon.blogspot.com.au/

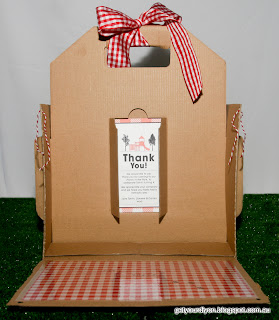
Step 3. Is to glue down the cardboard flaps on the inside of both sides of the box. On the top of the image above you will see the flaps I am talking about.

  • Glue on your little picnic blanket onto the inside flap, you can Download Free Here. You can even stick on a piece of clear contact to make it a little water proof. 

DIY Picnic basket out of an IKEA carry box http://getyourdiyon.blogspot.com.au/

Step 4. This option is up to you, but I made use of the little window which was already on the box and added a little thank you note to the guests.

DIY Picnic basket out of an IKEA carry box http://getyourdiyon.blogspot.com.au/

This photo is a in action from my friends Instagram photo on the day.

DIY Picnic basket out of an IKEA carry box http://getyourdiyon.blogspot.com.au/

Already to be filled..

DIY Picnic basket out of an IKEA carry box http://getyourdiyon.blogspot.com.au/

 That is me on the side setting up the table..

DIY Picnic basket out of an IKEA carry box http://getyourdiyon.blogspot.com.au/

The Birthday Boy who turned 4.

Hope you enjoyed the Tutorial!!
 
 I will be also sharing with you soon on how I have made use of one of the left over baskets which I have turned into a Art Activity box for a little boys Birthday gift on the weekend..

Please feel free to share any images if you ever make one..

xo
Daneve