Friday, June 29, 2012

DIY Washi Tape Dispenser made from a Cling Wrap box.

DIY Washi Tape Dispenser made from a Cling Wrap box. http://getyourdiyon.blogspot.com.au/2012/06/diy-washi-tape-dispenser-made-form.html

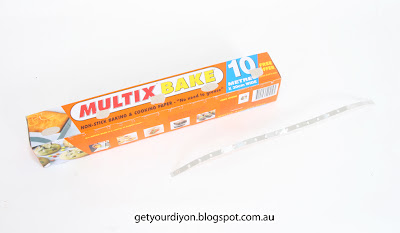
I am starting to build up my Washi Tape collection and really needed a dispenser for them but didn't want to spend money on one. So I had a look around the house to see if I could make one, well funny enough I had just finished a roll of cling wrap and thought this is perfect.

DIY Washi Tape Dispenser made from a Cling Wrap box. http://getyourdiyon.blogspot.com.au/2012/06/diy-washi-tape-dispenser-made-form.html

In our house hold we are big on recycling so I think I will make a few more once my collection grows.

Step 1. Don't throw out your kitchen paper dispenser boxes next time you finish a roll. The ones that have the serrated metal strip on them.

DIY Washi Tape Dispenser made from a Cling Wrap box. http://getyourdiyon.blogspot.com.au/2012/06/diy-washi-tape-dispenser-made-form.html

Step 2. Carefully take of the serrated metal strip, it should just peel off starting from one end first.
(Be very careful as it is sharp)

DIY Washi Tape Dispenser made from a Cling Wrap box. http://getyourdiyon.blogspot.com.au/2012/06/diy-washi-tape-dispenser-made-form.html


Step 3. Cut off the top lid flap.

DIY Washi Tape Dispenser made from a Cling Wrap box. http://getyourdiyon.blogspot.com.au/2012/06/diy-washi-tape-dispenser-made-form.html
Step 4. Glue on your desired paper or some contact paper. ( I used Kraft paper and covered it in clear contact)

DIY Washi Tape Dispenser made from a Cling Wrap box. http://getyourdiyon.blogspot.com.au/2012/06/diy-washi-tape-dispenser-made-form.html


Step 5. Hole punch each ends then you can add a piece of dowel. 


Step 6. Hot glue the sarrated strip back on one side of the box, make sure you glue the serrated bit of the strip slightly higher than the edge of the box as this will make is easier the cut of the tape.

Once step 6 is done you can add your tapes to your new dispenser.

Hope you enjoy it as much as I am enjoying mine..

xo
Daneve

DIY Recycled Activity Box

DIY Recycled Activity Box http://getyourdiyon.blogspot.com.au/2012/06/diy-recycled-activity-box.html

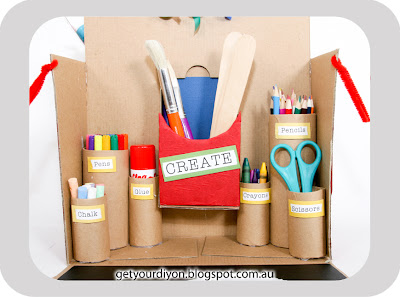
As I mentioned we have a Birthday Party on the weekend for our friends little boys 3rd Birthday.  I really wanted to make use of 1 of the left over Picnic Baskets which is in the below post. So when I was looking at them, I thought about this idea of up-cycling them into a "Kids Activity Box", I am really happy how it turned out.

Step 1. First I peeled off the picnic blanket that was on the inside flap then I replaced it with a piece of chalkboard adhesive.


DIY Recycled Activity Box http://getyourdiyon.blogspot.com.au/2012/06/diy-recycled-activity-box.html


Step 2. Cut up toilet rolls and a postage tube then glue on some Kraft Paper (color & print is up to you) 
To make the main center holder, I just cut up some cardboard and hot glued them to form the holder. You will see the box already has the two bits of cardboard which you can create the side flaps of the holder.


Step 3. Work out your positions of your tube holders then hot glue them into place. You can also glue on little labels to them like I have.


DIY Recycled Activity Box http://getyourdiyon.blogspot.com.au/2012/06/diy-recycled-activity-box.html


Step 4. Paint the sides of the box in your desired colour, then you can add either paper or adhesive (contact paper) to the front and back of the box.

DIY Recycled Activity Box http://getyourdiyon.blogspot.com.au/2012/06/diy-recycled-activity-box.html


Step 5. Print out the free label to stick on the front and back of the box.


With the other side of the box i have added a few extra items for him to use.

DIY Recycled Activity Box http://getyourdiyon.blogspot.com.au/2012/06/diy-recycled-activity-box.html


I am sure the kids will get alot of use out of it.

Let the Creating begin I say!!!

xo
Daneve

Wednesday, June 27, 2012

DIY Picnic basket out of an IKEA carry box.

DIY Picnic basket out of an IKEA carry box http://getyourdiyon.blogspot.com.au/

When planing any of my parties am a big beliver in recycling things before spending a lot of money at party stores. You can be amazed at what you can find and re-use over and over again. 

When I started to plan my son's Birthday picnic in the park party, I really thought it would be nice for every family to fill up a basket with their lunch, then to sit on the ground and have their own little picnic lunch.

As I was on a tight budget, I really didn't have the money to buy 20 real baskets. I noticed a friend carrying a free cardboard carry holder that she had just picked up at IKEA. The idea came into my head on how I could make use of the baskets and knew they could be used again after his party.
 As I needed 20 holders, I didn’t just want to walk out with them, so I asked the staff if I could purchase them. I was lucky to find out that I only needed to pay 20 cent for the whole lot! Bargain!!

DIY Picnic basket out of an IKEA carry box http://getyourdiyon.blogspot.com.au/
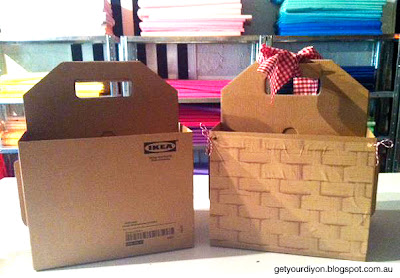
So this is a before and after shot.
(please excuse the iPhone photo)


DIY Picnic basket out of an IKEA carry box http://getyourdiyon.blogspot.com.au/

Step 1. Choose the side you want to make the drop down picnic blanket side. I chose the side that had the little middle window looking side. Once you have chosen the side, you can cut both corners of that side to open it up. (Use scissors or a Stanley knife to do this)


DIY Picnic basket out of an IKEA carry box http://getyourdiyon.blogspot.com.au/

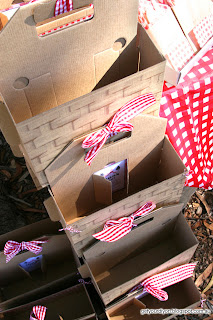
Step 2. Glue down the Basket weave print onto the front and back of the basket. I have included the free printable here of the weave. Cut up brown craft paper in A4 size and place them though the printer and trim them up a little before gluing them on.
  • Hole punch the two top corners of the flap and both sides of the front of the box. This will be where you can tie some string to hold it closed.

DIY Picnic basket out of an IKEA carry box http://getyourdiyon.blogspot.com.au/

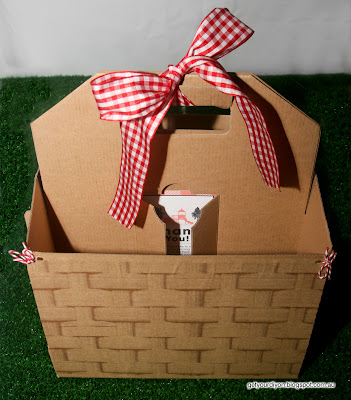
Step 3. Is to glue down the cardboard flaps on the inside of both sides of the box. On the top of the image above you will see the flaps I am talking about.

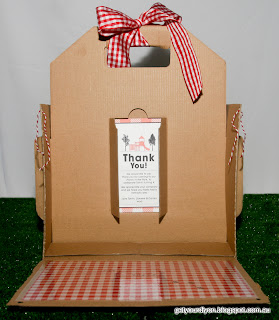
  • Glue on your little picnic blanket onto the inside flap, you can Download Free Here. You can even stick on a piece of clear contact to make it a little water proof. 

DIY Picnic basket out of an IKEA carry box http://getyourdiyon.blogspot.com.au/

Step 4. This option is up to you, but I made use of the little window which was already on the box and added a little thank you note to the guests.

DIY Picnic basket out of an IKEA carry box http://getyourdiyon.blogspot.com.au/

This photo is a in action from my friends Instagram photo on the day.

DIY Picnic basket out of an IKEA carry box http://getyourdiyon.blogspot.com.au/

Already to be filled..

DIY Picnic basket out of an IKEA carry box http://getyourdiyon.blogspot.com.au/

 That is me on the side setting up the table..

DIY Picnic basket out of an IKEA carry box http://getyourdiyon.blogspot.com.au/

The Birthday Boy who turned 4.

Hope you enjoyed the Tutorial!!
 
 I will be also sharing with you soon on how I have made use of one of the left over baskets which I have turned into a Art Activity box for a little boys Birthday gift on the weekend..

Please feel free to share any images if you ever make one..

xo
Daneve

Monday, June 25, 2012

DIY Kids Art Work Hanger

DIY Kids Art Work Hanger http://getyourdiyon.blogspot.com.au/#


 It is School holidays here in Queensland, Australia so I think this is a perfect activity to do with your children.
If you are like me, that has a child in Kindy or daycare, you will know how many paintings & collages you get. At first I just had a pile growing in the corner didn't know what to do with them all.

Well this is one way we now hang some of them, which is an activity I did with my son.

DIY Kids Art Work Hanger http://getyourdiyon.blogspot.com.au/#

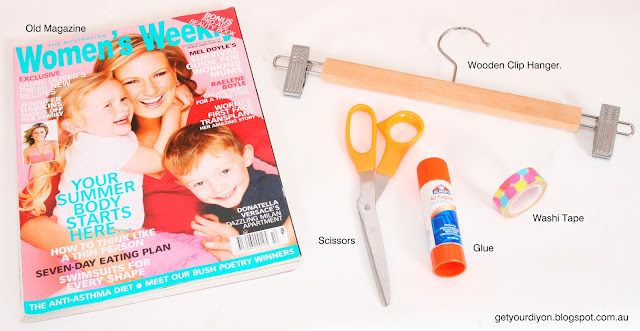
What you need:
1 x Old Magazine that you can cut up
Pair of scissors
Glue Stick
Your favorite Washi Tape (my son picked out this one) 
1 x Wooden Clip Hanger (I get mine from IKEA) 


Step 1. Cover the wooden section and clip with the tape. Now if you don't have Washi tape you can just glue strips of coloured paper.


Step 2. Work out what you want to put on the Hanger, I just picked "Tahlin's Art" which is my sons name and Art. I was going to put Artist Tahlin. It is really up to you. 


Step 3. Once you know what you want let your child help you flip through the magazine to find the letters. This was a good learning alphabet game to play to with them.
Make sure they are the right size to fit on the wooden section of the hanger.


DIY Kids Art Work Hanger http://getyourdiyon.blogspot.com.au/#


Step 4. When you have all the letters you need place them on the hanger the glue them on.


DIY Kids Art Work Hanger http://getyourdiyon.blogspot.com.au/#


Then you can hang their art work up on the wall just like a wall hanging.

Tip: When it starts to get to full what we do is use some of them a wrapping for presents. Since we have hit the age of many kids party this is one way we save on buying new gift wrapping.

Enjoy!!
xo
Daneve

D.I.Y Non-Toxic Microwave Cleaner

D.I.Y Non-Toxic Microwave Cleaner http://getyourdiyon.blogspot.com.au/

Today I noticed my Microwave was well over due for a good clean, so thought I would share with you what I use to clean it.


Yes a very dirty Microwave. Bit embarrassing really heheh

D.I.Y Non-Toxic Microwave Cleaner http://getyourdiyon.blogspot.com.au/
What you will need:
  • 1/2 cup of white vinegar
  • 1 cup of boiling water
  • 1 tablespoon of Bi - Carb of Soda
  • Mircrowave safe large bowl
  • Cleaning cloth
Step 1.  Mix 1/2 cup of white vinegar, 1 cup of boiling water and 1 tablespoon of bicarb in a micro safe large bowl. Place the bowl into the microwave without a lid and cook on high for 1 -2 minutes allowing the mixture boil but not boil over.

Step 2. Once the microwave has finished remove the glass & turntable. These can be cleaned in the sink with small amount of warm soapy water and dried well. While the microwave is still warm and steamy wipe the interior out with a cloth.


Step 3. Leave mircowave door open to air for 10 minutes before placing glass & turntable back in..

Now your microwave is clean and ready to use again..

xo
Daneve


Saturday, June 23, 2012

D.I.Y - Recycle cans into Halloween Gifts

DIY Halloween Gift Ideas http://getyourdiyon.blogspot.com.au

I thought I would share one up-cycle D.I.Y project I will be doing this year as gifts for Halloween.
This is another reason, next time you go to throw out a pull lid tin can, think about what you can make before you do so.


I always have cans in my pantry, so I make sure I don't throw them out as they are a perfect recycling item. For this D.I.Y project it really doesn't matter what size they are but the best ones to use are the ones that have the pull off lids as the don't leave a sharp edge.


Step 1. Soak them in hot soapy water for 15min to be able to clean and take the label off.


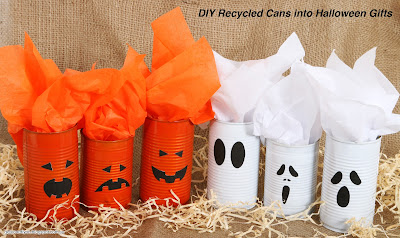
 Step 3. Spray paint them white using a High Gloss quick drying paint. (Colour is up to you) but for this project I made some orange ones for the Pumpkin cans, and white for the Ghost cans.
Here in Australia I get my spray paint from Bunnings Warehouse.

Free Printable Template DIY Halloween Gift Ideas http://getyourdiyon.blogspot.com.au

Step 4. While the cans are drying you can print out our free Halloween Pumpkin & Ghost Face Templates. You can either print it out on full sheet sticky label paper or normal paper.


DIY Halloween Gift Ideas http://getyourdiyon.blogspot.com.au

Step 5. You can then glue or stick your faces on and add you desired treats to them, wrapped with tissue paper.

DIY Halloween Gift Ideas http://getyourdiyon.blogspot.com.au

Another option to the Pumpkin one is to add an extra bit of green tissue paper to the top and add a little gift tag.
These will make a perfect gift at Halloween for kids, teachers, party favors and so on.

Trick or Treat !!

Enjoy

xo
Daneve

D.I.Y - Recycled Jar Candle Holders

http://getyourdiyon.blogspot.com.au/

Next time you use a jar and decide to throw it out, think about what you can make before you do so. 
You will be amazed what you can recycle and reuse.

http://getyourdiyon.blogspot.com.au/

To make these jar candle holders it really doesn't matter what size the jar is. I have used these pasta sauce jars, as we always have them in our pantry.

Get Your D.I.Y on!! http://getyourdiyon.blogspot.com.au/

Step 1. Soak them in hot soapy water for 15min to be able to clean and take the label off.

Get Your D.I.Y on!! http://getyourdiyon.blogspot.com.au/

Step 2. Wrap one with string, one with some tape and sticky dots. With the other jar, use a hot glue gun and write "Love" or anything else you feel like on the jar.

Get Your D.I.Y on!! http://getyourdiyon.blogspot.com.au/

Step 3. Spray paint them white using a High Gloss quick drying paint. (Colour is up to you)
Once dry you can remove string, dots, tape and glue.
You can also add some wire to them to make them into hanging candle holders.

Get Your D.I.Y on!! http://getyourdiyon.blogspot.com.au/

Step 4. It's up to you, but I made them a bit more pretty by added some string & washi tape to them.

Get Your D.I.Y on!! http://getyourdiyon.blogspot.com.au/

Step 5. Add candles (I used tea candles) to make the prettiness glow.
These make a perfect addition to any room and as a perfect give to someone special.

I hope you enjoyed my first quick tutorial for this blog, I am sure they will get better as time goes on.
xo
Daneve